The Leaf Keeper’s Guide
- Nina Ross
- Sep 3
- 2 min read

Creative Ways to Craft with Leaves
There’s something special about bringing the season indoors—the colors, the textures, the memories of finding those treasures that awaken as you view them.
My kids have become increasingly enthusiastic about decorating for the seasons and I’m learning to loosen my grip on control, letting their little hands and big imaginations have a say in how our home looks. As much as I love changing our décor with each new season, my bank account… not so much. So, I’ve been scouring Pinterest for ideas that are inexpensive, natural, and beautiful. Specifically, projects that are kid-friendly but don’t scream “a three-year-old made this.”
Here are some simple ways to decorate with the natural beauty of the season, while letting the kids join in on the magic of creating a cozy home.
"A fallen leaf is nothing more than a summer’s wave goodbye." – Unknown

Decorating with Nature
Glue Leaves on a Window or Door
If your kids are anything like mine, you’ll be finding leaves in every part of the home, car, and...laundry room? Here’s a simple way to turn those little treasures into seasonal décor.
Have your kids collect their favorite leaves, then press them between the pages of a heavy book overnight. (You can add a few weights on top for extra flattening power.) Once the leaves are flat, use a small paintbrush to coat one side with glue. Press them gently onto the window, and just like that, you have a beautiful autumn display and a collage of their what their little minds found to be most beautiful. They’ll love showing off their masterpiece.
When the season ends, simply spritz the leaves with window cleaner and scrape away the glue. It’s a little messy, but oddly satisfying.


Tape them Up
Not a fan of glue or the scraping that comes with it? Try washi tape instead. Simply tape the leaves to a wall or window for an easy, no-mess display. This method is perfect for kids who like to change their minds mid-project, or for parents who want the option to quietly rearrange things once the little artists have walked away (wink, wink).
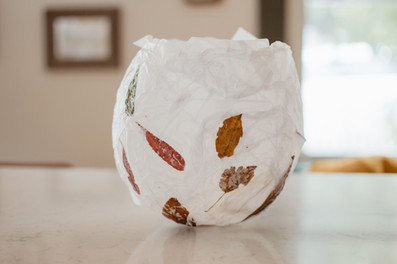
Lanterns

Materials:
Leaves and/or flowers
A Balloon
Tissue Paper
Glue
Making a Lantern
Step 1
Gather your pressed leaves and flowers, a bowl of water, tissue papers cut in smaller squares (we did about 4x4 inch squares), and a bowl of glue and water mixed, (a 1:1 ratio).
Step 2
Blow up a balloon to the size you want the lantern to be. Cover the bottom half of the balloon with tissue paper pieces dipped in water first, then cover in one layer of tissue paper dipped in the glue and water mixture.
Step 3
Add your leaf and flower treasures. Cover with one layer of tissue paper over the treasures to be sure they stay on.


Step 4
Let the lantern dry fully (overnight, or longer if they use lots of glue) and then pop the balloon
Step 5
Put in a flameless candle and enjoy!


Comments